用Shiny 打造一个简易但功能完善的AI 绘画APP
众所周知,Shiny 是 Rstudio 开发的一款基于 R 语言的网页应用程序,允许用户将 R 功能脚本编写成简易的 UI 界面,从而允许不懂编程的人使用,但是 R 语言的语法和功能较为复杂,且执行效率较低,对并发的支持也不好。幸好,Rstudio 同时开发了基于 Python 的 Shiny 程序,且最近新推出的 Express 功能让代码更加的简洁,本文将介绍如何使用 Shiny Express 开发一个简易但功能完善的 AI 绘画 APP。
如何安装 Shiny Express 大家可以访问官方网站 进行了解,简单来说我们简易构建一个纯净的虚拟环境,然后安装对应的包即可,例如:
mkdir myappcd myapppython3 -m venv .venv source .venv/bin/activate
然后在虚拟环境下安装 Shiny Express:
pip install shiny pip install git+https://github.com/posit-dev/py-htmltools.git pip install git+https://github.com/posit-dev/py-shiny.git
AI 绘画 API 我们的 AI 绘画 API 还是来自 CloudFlare 的flux 模型,具体参照前文:如何使用 Python 调用 CloudFlare WorkerAI 提供的 Flux 模型
代码结构 - myapp ### 这里是主目录 - app.py ### 这个是主程序 - utils.py ### 这里写调取API的功能 - .venv ### 虚拟环境
调取API的功能的实现(utils.py) 我们要实现以下功能:
调用 API 获取图片
图片保存到本地
使用大语言模型对提示词翻译并优化
全程使用异步函数
具体的代码如下:
import base64from openai import AsyncOpenAIfrom pathlib import Pathimport tempfileimport aiohttpimport asyncioclass WorkerImage (): def __init__ (self, account_id, api_token ): self .flux_system_prompt = "...提示词前文有提到,这里不重复写了" self .account_id = account_id self .api_token = api_token self .endpoint = ( f"https://api.cloudflare.com/client/v4/accounts/{account_id} /ai/run/@cf/black-forest-labs/flux-1-schnell" ) self .headers = { "Authorization" : f"Bearer {api_token} " , "Content-Type" : "application/json" , } async def _get_flux_image_data (self, prompt, num_steps ): payload = { "prompt" : prompt, "num_steps" : num_steps } async with aiohttp.ClientSession() as session: async with session.post(self .endpoint, headers=self .headers, json=payload) as response: if response.status == 400 : return None else : result = await response.json() image_data = base64.b64decode(result['result' ]['image' ]) return image_data def _save_image_to_tmp_file (self, image_data ): dir = Path(__file__).resolve().parent with tempfile.NamedTemporaryFile(dir =dir , suffix='.png' , delete=False ) as f: f.write(image_data) temp_file_path = f.name return temp_file_path async def get_translate_promt (self, prompt ): client = AsyncOpenAI( api_key=self .api_token, base_url=f"https://api.cloudflare.com/client/v4/accounts/{self.account_id} /ai/v1" , max_retries=5 , ) chat_completion = await client.chat.completions.create( messages=[ { "role" : "system" , "content" : self .flux_system_prompt, }, { "role" : "user" , "content" : prompt, } ], model="@cf/meta/llama-3.3-70b-instruct-fp8-fast" , ) return chat_completion.choices[0 ].message.content async def get_image (self, prompt, num_steps, is_translate=False ): new_prompts = "" if is_translate: new_prompts = await self .get_translate_promt(prompt) else : new_prompts = prompt image_data = await self ._get_flux_image_data(new_prompts, num_steps) if image_data: local_file = self ._save_image_to_tmp_file(image_data) local_file = local_file.split("/" )[-1 ] return local_file, new_prompts else : print ("image data is None,please check your inputs" ) return None , new_prompts
这个类需要使用account_id 和 API, 需要去 Cloudflare 获取!
主程序的实现(app.py) 我们要实现以下功能:
一个 NavaBar, 为后续增加功能准备
一个 SideBar, 用来收集用户的输入,作为主要交互区域
一个 MainPanel, 用来显示用户的输出
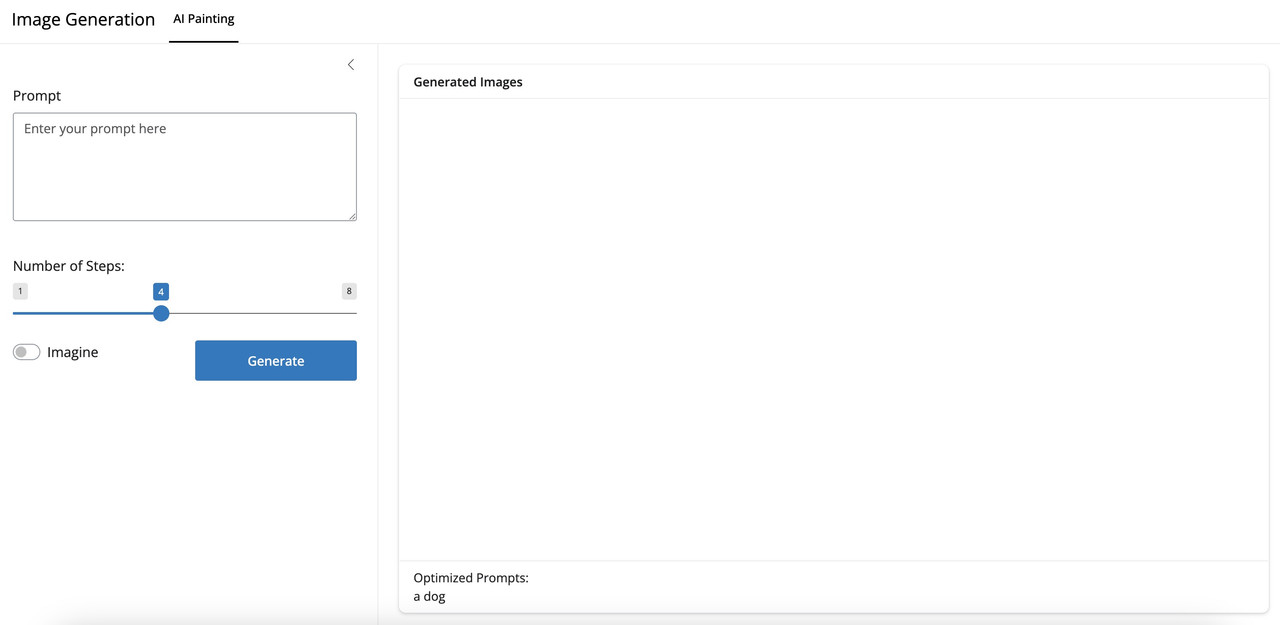
完成后的界面如图:
具体的代码如下:
from shiny.express import ui, render, input from shiny import reactivefrom utils import WorkerImagefrom pathlib import Pathui.page_opts(title="Image Generation" , fillable=True , id ="page" ) prompts = reactive.value("a dog" ) generated_image = reactive.value(None ) @reactive.effect @reactive.event(input .submit async def generate_image (): account_id = "XXXXXXXXXXXXXXXXXXXXX" api_key = "XXXXXXXXXXXXXXXXXXXXXXX" worker = WorkerImage(account_id, api_key) dir = Path(__file__).resolve().parent final_link, new_prompts = await worker.get_image(input .prompt(), num_steps=input .steps(), is_translate=input .optim()) prompts.set (new_prompts) if final_link is not None : generated_image.set ({"src" : str (dir / final_link), "width" : "500px" }) with ui.sidebar(width=450 ): with ui.tooltip(placement="right" ): ui.input_text_area("prompt" , "Prompt" , placeholder="Enter your prompt here" , rows=5 ) "You can use English or Chinese to generate images." ui.input_slider("steps" , "Number of Steps:" , min =1 , max =8 , value=4 ) with ui.layout_columns(class_="d-flex align-items-center" ): with ui.tooltip(placement="bottom" ): ui.input_switch("optim" , "Imagine" , False ) "Switch on to optimize your prompt." ui.input_action_button("submit" , "Generate" ,class_="btn-primary" ) with ui.nav_panel("AI Painting" ): with ui.card(): ui.card_header("Generated Images" ) @render.image(delete_file=True ) def image (): return generated_image() if generated_image() is not None else None with ui.card_footer("Optimized Prompts:" ): @render.text def get_prompts (): return prompts()
是的,整个代码非常简洁,我们只用了很少的代码就完成了相当复杂的功能,值得称赞!
网站演示 可以访问以下链接访问演示网站:


